
After a semester of pre-production work on my Augment project — outlining, storyboarding, writing — I decided it was finally time to build something. I wanted to build one of the scenes in order to further investigate the materials I’ve chosen and to see about the storytelling power of this format.
Since the first piece will inherently need to stand without the others, I needed to select a scene from Engelbart’s story that’s capable of making sense on its own without the context of the larger arc. After some deliberation, I chose the first transmission of data on the internet between the Augment team at Stanford and UCLA on October 29, 1969, scene 10 in the full story, near the end of my second act:

After some sketching in which I imagined the piece as consisting of two-halves of a divided cube, one containing the UCLA side (all white, smooth, and institutional with men-in-suits leaning over massive mainframes) and one the Augment side (funky and cluttered furniture in lurid 60s colors, unkempt hippie-hackers sitting at the small familiar-looking NLS system). Each half would have animated projected figures moving around and small screens enacting the transmission of data between the two halves. The two halves would be connected by a series of miniature telephone polls that would carry the actual connecting cables that would coordinate the two sculptures.
I got started by building a cardboard prototype of half of the piece and then experimenting with projecting onto a scrim suspended in it, using LED lighting to blast out the parts of the image that make it through the scrim onto the walls and furniture:
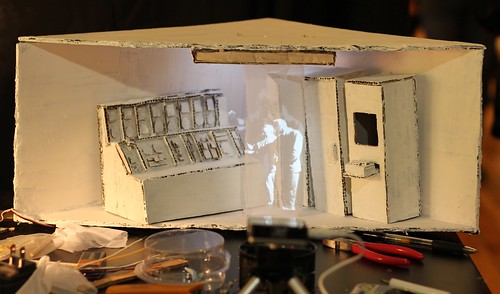
Here’s a video of the prototype that makes it a little clearer how it works:
First ARPANet transmission: UCLA set prototype from Greg Borenstein on Vimeo.
While I learned a lot from this prototype, I want the final version of the UCLA half to have a slick, shiny finish with the classic coldness of marble, but achieved with laser-cut plexiglass. But I also want to be able to include a level of “gizmology” detail that gives a feeling of the texture of the real environment, for example here’s a photo of the model of Sigma-7 mainframe that was in use at UCLA at the time of the transmission (and is modeled in cardboard in my prototype):

But how to achieve this level of detail while still retaining the clean classic white plastic look I want for the whole piece?
After extensive discussions with ITPers proficient in the use of the laser cutter, I decided to test out using the laser to raster etch the plexi to create a kind of bas relief to represent the Sigma-7’s panels. After designing a fragment of the panel in Illustrator, I sat with ITP resident Paul Rothman and ran a series of tests with different laser settings. Here’s what the results looked like:

(Check out the larger size on Flickr)
While I was skeptical of this etching approach at first, even the first test (on the very left) was quite encouraging. Though shallow and hard to see from far away, the details were definitely legible. So, we proceeded with more tests, constantly tweaking the laser settings to achieve a deeper etch and more definition between the three depths we were cutting.
Here’s a table of the settings we used for each iteration, moving from left to right in the sample illustrated above (Layer 1 is the deepest cut, layer 2 is in the middle, and layer 3 is the shallowest):
#laser-settings tr td {
padding: 5px 7px;
text-align: left;
}
| Attempt | 1 | 2 | 3 | 4 | 5 | 6 | ||||||
| Power | Speed | Power | Speed | Power | Speed | Power | Speed | Power | Speed | Power | Speed | |
| Layer 1 | 70 | 100% | 100 | 100% | 100 | 90% | 100 | 50% | 100 | 30% | 100 | 20% |
| Layer 2 | 50 | 100% | 60 | 100% | 60 | 90% | 60 | 70% | 60 | 60% | 60 | 55% |
| Layer 3 | 30 | 100% | 20 | 100% | 20 | 90% | 20 | 90% | 20 | 90% | 20 | 90% |
In the end, I was very happy with how the relief turned out. As the cut got deeper, shadows started to emerge that made the details readable even at a pretty good range and the parts actually got to be even somewhat close to their real scale.
I’m currently proceeding towards designing out the rest of the hardware details for cutting and assembly. I’ll post more pictures of the final pieces as they come together.
That looks amazing!
I’m surprised there’s not an issue with scorch marks… and I still don’t understand the trade off between speed and power. It seems like low speed + low power should give the same result as high speed + high power… unless there’s something interesting going on with how the acrylic melts / cools.
This info should end up on the wiki!
Oh I also wonder if you could laminate several layers of 1 / 16″ or 1 / 32″ plexi together to get a color gradient across cut depths. Can the laser cut through the methylene chloride glue we’re always using on the floor?
Each of my shallower layers is both faster and at lower power than the deeper one above it. Like the final (version 6) settings: deepest: power = 100, speed = 20%, middle: power = 60, speed = 55%, shallowest: power = 20, speed = 90%. Moving a weaker laser over the material faster results in a shallower cut.
There is a little bit of an issue with the material around the edges of deeper cuts getting a little messy, but that was an acceptable trade-off for how much more visible the deeper cuts were.
I think your lamination suggestion would totally work if I wanted color. Arturo was telling me about one of the guys at AMS who makes huge stacks of different colors of paper glued together and then laser cuts them so that the different colors emerge with the cut.
Why not cut first, then glue the layers together? That’s what I’m thinking of doing…
Well, my top layers aren’t connected to themselves; they’re lots of little isolated pieces. If you look at the picture, each later would end up being a bunch of tiny circles and squares that I’d then have to glue in place. I did some experiments with designing the thing as three layers where each little piece was connected to the others by thin strips of plastic, like a model airplane kit. The idea was that I’d then be able to glue each layer on top of the others and then remove the intermediate connecting pieces. But that seemed like a hugely increased amount of work (if it would even succeed) compared to just using the finished, etched piece from the cutter.