
A couple of months back, the guys at GitHub bought a stoplight. They ordered it on Ebay from a seller in the UK. Their plan was to hook it up to their build system.
The idea was that when they check code into their continuous integration system (see defunkt/CI Joe) the stoplight would turn yellow while the code was building, red if the build failed because of failing tests, and green if the build succeeded. It would give them a large unmissable indicator in their office for the status of their current code.
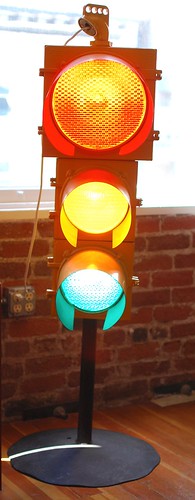
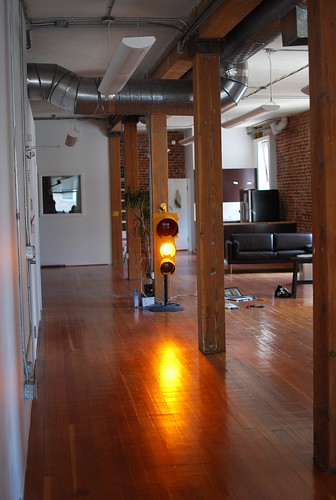
The stoplight at the start of the project:
One of the GitHub founders, PJ Hyett played around with using an Arduino to integrate with the continuous integration server. He wrote a ruby script that polled the server and then sent a serial message to an Arduino which turned on an appropriate green, yellow, or red LED.
This worked, but had a couple of downsides: first it required a laptop to be connected to the Arduino to talk to the CI server; second it only lit up little LEDs rather than the big beautiful stoplight. For good reason, as a beginner PJ balked at the idea of controlling the AC power needed by the stoplight. After all, AC can kill you.
That’s where I came in.
Melissa Severini, GitHub’s admin, got in touch with me to see if I was interested in taking on the project of hooking up the stoplight. I told her I definitely was and got to work putting together a proposal.
My goal was to improve PJ’s take on the project by handling all of the networking on the Arduino itself and, of course, to control the actual stoplight rather than just LEDs.
On the AC side, having read Sparkfun’s tutorial on controlling AC with relays, my plan was to connect one relay to each of the stoplight’s lights and then to run all of those to a single Arduino which would itself connect to GitHub’s CI Joe instance over their office wifi.
Initial proposal sketch:
As you can see from that photoshop mockup, I was planning on using the Asynclabs BlackWidow for the networking part of the project. The BlackWidow is a neat little Arduino variant which has wifi hardware built into it.
In the final planning stages, this was the component of the project that changed the most: I ended up ditching the wifi in favor of using Ladyada’s ethernet shield with a Wiznet module to connect the Arduino directly to GitHub’s router via an ethernet cable. There were two main reasons for this decision: first of all, I realized that trying to run a wifi antenna inside the solid steel box of the stoplight’s housing was probably not the smartest idea, and second I found asynclabs’ wifi code for the Arduino to be simply too complicated for me to wrap my head around in the few days I had to prepare before traveling out to SF. I was able to get the BlackWidow to connect to a wifi network, but never to actually reach out beyond it to real URLs on the internet.
So, my proposal submitted and accepted by GitHub, I ordered parts and scheduled flights.
The second week of May, my parts began to arrive and I soldered up the Sparkfun relay boards and tested them with my Arduino. I also talked with Tom Igoe, ITP professor and member of the core Arduino team, who gave me a bunch of great advice about using the relays safely and also explained how to power the Arduino itself off of the AC power as well as the stoplight (a subject I’ll return to later).
Last friday, I flew out to SF with a bag full of electronics: 7 Arduinos, 3 USB cables, a soldering iron, a pair of wire cutters, 2 packages of rubber feet, three spools of threaded hookup wire, 3 relays, etc. etc. I was surprised my bag made it through security with nothing more than a TSA inspection notice slip. And on Saturday, the build process began.
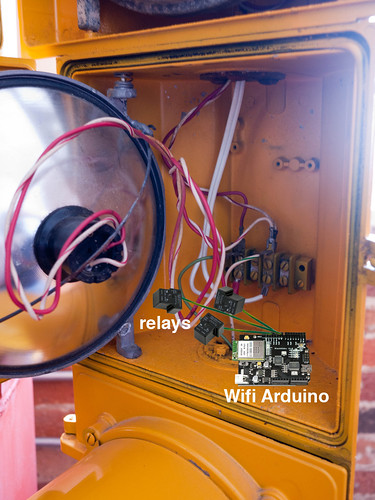
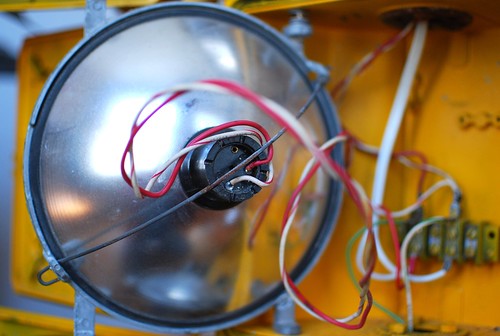
The first thing I did on arrival was to open up the stoplight and take a look inside:
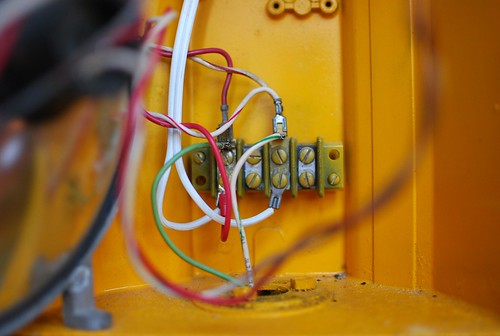
As you’d expect for a piece of urban infrastructure that needs to work reliably for a long period of time, the stoplight’s design is extremely simple. The AC runs in from its external plug (the white cable in the picture above) to a bank of screw terminals through which it’s distributed to all three of the lights:
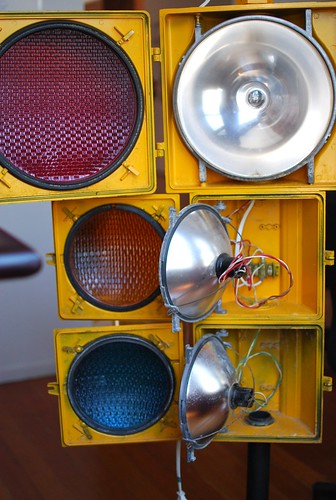
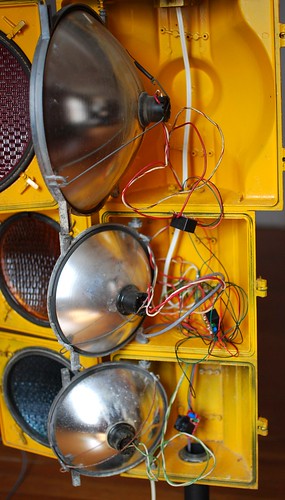
From there a pair of wires travels out to each light fixture, one hooked up to each side of the AC:
Thanks to Andy Delcambre, I’d seen photos of this setup in advance and taken it into account when coming up with my plan. Andy was extremely helpful in the planning of this project and throughout its execution; I couldn’t have done it without him.
After having checked out the wiring for myself, I spent the rest of my first day in the GitHub office installing the relays.
A relay is a physical switch that can be closed by running a small amount of electricity through a pair of electromagnets. The result is a device that lets you control large amounts of electricity (like 120V AC) via small amounts (like the 5V DC that comes off an Arduino’s pins).
As I mentioned before, I’d soldered up three of the Sparkfun relay breakout boards before coming out to SF. These have three wires that get connected to the Arduino: ground, +5V, and a control line that goes to one of the digital pins. On the other side, it has two terminals for the AC connection. The idea is that you break one of the two AC wires going to your target device (in this case one of the stoplight lamps) and solder the relay into the break. Then when you pull the Arduino control pin high, the AC part of the circuit is closed and your devices turns on; when the control pin is low, the device is off.
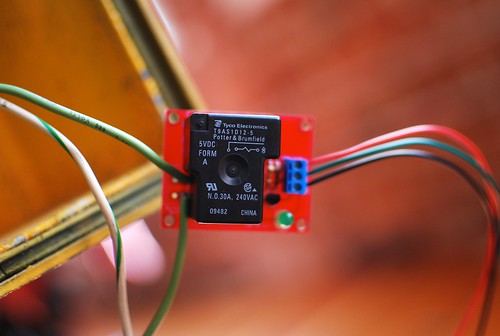
Relay with control board soldered up to one of the stoplight lamps:
Once I had the first relay soldered up and plugged in, I wrote a basic blinking LED-style Arduino sketch that would simply toggle the relay control pin on and off every 500ms. After being sure that no one was touching any part of the stoplight, I plugged it in and the result was a blinking lamp:
Note the satisfying clicking sound. (Brief aside: next time you’re standing at a street corner waiting for the “walk” signal, listen closely to the big box attached to one of the utility polls nearby and you’ll hear a giant relay clicking away blinking the “don’t walk” hand.)
Having proven that the relays could control the stoplights, I went ahead and attached relays to the other two lamps as well following the same procedure, testing each one in turn.
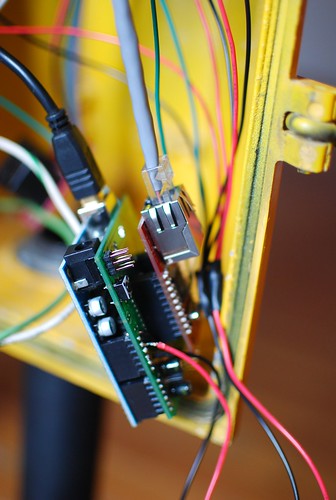
Now, I had control of all three of the lights. The next step was to connect to the internet. To do this, I attached the Ladyada ethernet shield with the wiznet module to my Arduino and plugged an ethernet cable from that into the GitHub office router.
I had experimented with Arduino and Ethernet before so I was pretty familiar with the hardware and software involved. The main new element this time was that instead of serving up webpages from the Arduino I needed to use the Arduino as a client and specifically I needed to capture the status of a particular URL since that’s how CI Joe reports its status (a 200 response means a successful build, a 412 with the word “building” means the build is in progress, and a 412 with a git sha as the body means that the build is broken and the commit corresponding to that particular sha is to blame.)
After a bit of googling, I came across the Arduino String library which includes a “contains” method that will search a given string for some substring and return true if the substring is found. If I formulated the request correctly from the Ethernet library I could get the library to print out the response headers which include the status, which I could then pull out using this contains method.
Once I had that figured out, I pretty quickly put together a sketch that would poll a given URL and blink the red lamp if that URL was 400 and blink the green lamp if it was 200. I tested my code against a URL on a server I controlled so I didn’t have to ask the GitHub guys to force a rebuild of their site every few minutes while I was working on things.
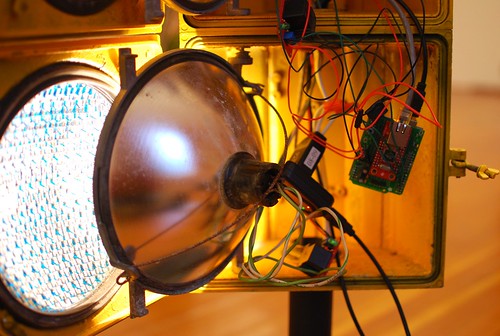
Before too long, I had the basic status switching working:
Now at this point, all the pieces of the project were theoretically in place; all that was left was putting it all together, pointing it at the real GitHub CI server, and rewiring it so the Arduino itself would also be powered from the AC coming into the stoplight from the wall.
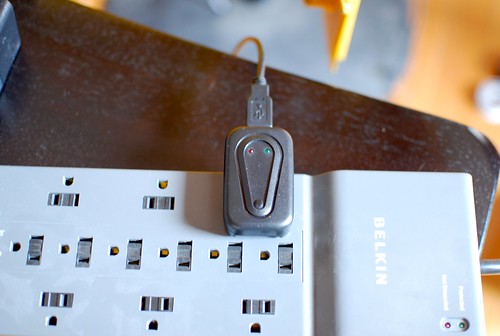
Up to this point, I’d been powering the Arduino with a simple AC to USB power converter:
Before I’d left New York, Tom Igoe had suggested simply wiring a two-prong outlet in series with the stoplight’s AC power cable and using that to power the Arduino so I didn’t need a separate power supply.
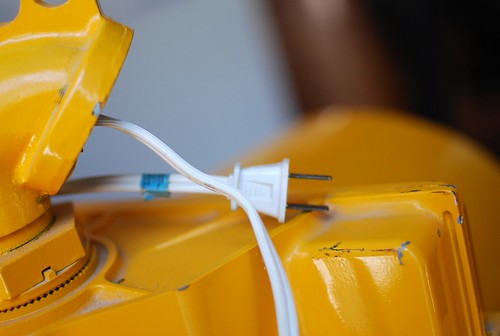
So, on Monday this is what we did. For some reason, the stoplight’s AC cord had been routed out of a hole in the top of its case:
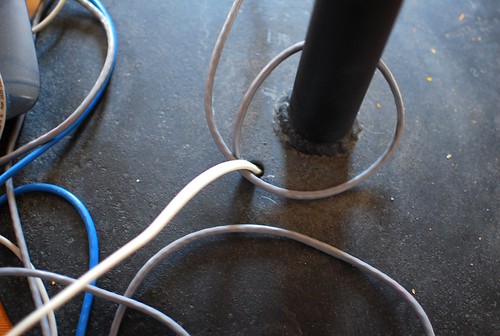
I cut this cord just below the bank of screw terminals and ran it back into the stoplight through a small hole in its steel base (a hole I’d also run the ethernet cable through earlier).
Then with Andy’s help (he had some experience with wiring AC and I was starting to be a bit feverish and under the weather by this point) I connected a two prong outlet as well as the leads that went to the screw terminals for all of the lamps to the wires out to the plug, screwing the whole mess of wires together with plastic screw caps:

Then, as you can see in that picture, I just plugged in the AC-to-USB power converter and ran a USB cable to the Arduino. Not the most elegant solution (and I could definitely have benefitted from a shorter USB cable that wouldn’t have taken up so much space inside the cramped stoplight case), but it did the job and was pretty straightforward and danger-free.
Now, the whole project was powered by simply plugging the stoplight’s trailing power cord into a wall outlet. I switched the Arduino over to point at GitHub’s real CI server and updated my response parsing and boom, the lights were switching based on the real status of the build.
I also rewrote the code slightly to use the Arduino’s timer library so that the current light would stay lit even while the Arduino was keeping track of the 10 seconds it was supposed to wait between polling the CI server.
Theoretically, the project should have been basically done at this point. But after I let it run for an hour or so, I noticed that the Arduino would start to get stuck, getting only an “incomplete headers” message from the Ethernet library on every response even when I could see that the server was doing the right thing when I hit it in the browser.
Thankfully, I had one more day before it was time for me to leave to head back home so I asked the ITP mailing list for help. Tom Igoe was nice enough to step in and save the day again by letting me know that there’s apparently a memory leak or some other problem in the Ethernet library and that the best way to keep it reliable over long periods of operation is to connect the Ethernet shield’s reset pin to one of the Arduino’s digital outputs and then pull it low after each successful request so that it will reset.
The next day, I came back into the GitHub office and followed his advice. After I figured out that I needed to call Ethernet.begin() again after resetting the shield, it worked like a dream, making requests reliably for a few hours.
At this point I declared the project feature complete and set about shoving all the electronic guts back inside of the stoplight case. In the planning stages this was something I’d actually been quite worried about because I assumed that, being steel, the stoplight case would be conductive and hence prone to making shorts on my boards. On the second day of the project, however, I had the presence of mind to test the stoplight with my multimeter and, much to my pleasure, I discovered that the layer of paint coating the thing was not conductive at all. In fact, nothing inside of the stoplight besides the screw terminals themselves were the slightest bit conductive. This made the prospect of stuffing quite a bit of wire and PCB into the stoplight safely much more likely.
So, I covered the AC connections of the relays with hot glue as a safety measure for anyone who might accidentally end up in close proximity to them with the stoplight still plugged in, and basically just shoved all of the wires inside until the case would close. It was a tight fit, but it worked in the end with space to spare.
I closed the whole thing up and got the guys to run a build and, lo and behold, the stoplight turned green!

Here’s how it looks from the other side of the office from the table around which most of the work at GitHub actually gets done:
I just want to say a big thanks to PJ Hyett, Chris Wanstrath, and Tom Preston-Warner, GitHub’s founders, for bringing me out as well as GitHub’s Kyle Neath who helped set up the CI Joe integration. This project would have been much harder and more dangerous without Tom Igoe’s advice and Andy Delcambre’s help at every stage of the build. And, of course, a big thank you to Melissa Severini for thinking of me for this project in the first place.
If you want to learn more, the code is, of course, on GitHub: atduskgreg/GitHub-Stoplight. And if you want some hardware bling for your own startup, don’t hesitate to get in touch.
Thanks for the write up!
Greg, Thanks for the heads up I’ve given the poster a kick up the backside!
I’ve added you to our RSS!
Awesome article!
Cheers,
Marcus
Thanks, Marcus! Hope I wasn’t too grouchy over there on you. 🙂
Nice work Greg!
As a real-world embedded developer, the level of sheer quackery surrounding the use of AVRs (sorry, “Arduino” for the hipsters) never ceases to amaze.
Seriously, going looking for a library to find if a string is within another string? You DO have the C library available, you know…
You _really_ need to go back and remount those boards, preferably outside the stoplight.
Remember, light bulbs get hot. When lightbulbs get hot, the inside of the stoplight gets hot. When the inside of the stoplight gets hot, hot glue gets soft, and maybe melts. Then your relay terminals [at some point] WILL come into contact with the metal body of the stoplight through a scratch in the paint. Then you’ll kill some poor githubber.
Get someone to design a real board for this [simple, and costs $100 to get it fabbed in china], and mount it in an enclosure on the back of the stop light.
Really enjoyed reading your post. This is what I love about small companies; they can do this sort of wacky and cool things =)
Awesome, this looks like a really fun little project!
I have to side with Gward here. Like him, I’m a professional embedded systems engineer (MSc). A lot of things you mention in your article make me cringe. The microscopically thin layer of paint on the inside is not conductive, so you just stick the entire ratsnest in and forget about it? Holy cow. I wonder if you even bothered to earth the case.
It’s nice that you can make fun little projects with an AVR, but clearly that does not qualify you for real-life jobs like these. No offense, but if you need to ask for help on how to hook up a relay, and have to resort to resetting the ethernet controller after every request, some bells should begin to go off in your head. Apparently they didn’t, leaving GitHub with not only a poorly designed and manufactured, but also dangerous product.
Please think twice before basing a career on your AVR hobby.
If you start selling these, I will buy one (or two) for my gaming company.
This is great. We use buildbot at BUG Labs to automate our build process and this could be a cool tie-in. We’ve done some similar work with an arduino on our “MotherBUG”, whereby we use an arduino (which is connected to our VonHippel Module to control a servo motor, which in turn controls the orientation of the BUG and camera. Have a look:
http://motherbug1.buglabs.net/service/Servo. We’ve even created a (still beta) BUGDuino module for people out there who are looking to do similar things.
Great post!
If you need to rewrite this, check out my Webduino library (http://webduino.googlecode.com) — it’s a webserver implementation on the Ethernet shield that simplifies the networking bit.
I’ve not tried adding Wiznet reset logic to the library, but that sounds like a nice change for the next version.
@archels & @Gward – this project isn’t about being a professional EE, it’s about having fun and doing something that pops into your mind. And just because the Arduino is High-Level doesn’t make it hipster, Arduino makes it accessible to people who have creativity and want to produce objects and not worry about the “right” way of doing something. EE’s shouldn’t feel endangered but rather enjoy people exploring electronics.
Greg, nice work! Great documentation!
GitHub + Arduino? Two great things combined in a single package…. 🙂
Thanks for the writeup. Can hardly wait for tomorrow to get back to tinkering…
Looks great! Strange that you got US style traffic lights from a UK seller.
I made a similar set to monitor the build on my current project at Softwire, but I had UK traffic lights which a) use low voltage AC and b) have a plastic body, so my build was without the scary electrocution risks you seem to have faced 🙂
I used a parallel port relay board, rather than an Arduino, so that I can control them with a ruby script. It was much easier to program.
Richard — Cool project. That parallel port relay board looks interesting. Do you have to keep it plugged into a desktop/laptop? That was part of why I went the arduino-ethernet route: I didn’t want the GitHub guys to have to keep a laptop plugged into the thing at all times.
John — Thanks for the defense there. I think you captured the spirit of this project perfectly.
@Greg – yes, it has to plug into a computer (and one with a parallel port, which isn’t that common any more :-).
The pros are that it’s a great deal easier to write (and debug) a ruby script which scrapes a web page and changes the lights than program an Arduino. The cons are that there has to be a PC on and connected by a wire to the lights. However, that’s not an issue in my office.
(There are USB versions of that relay board — I wish now that I’d paid the extra €5 or so to get one.)
Reminds me of my old EE course. The professor brought in a black box we needed to control. The box interfaced with a set of traffic lights. Good stuff.
The idea is a nice one and I might have a go myself.
However: short of talking about how you remembered to inhale and exhale throughout, I’m not sure you could have drawn out your explanation, of interfacing some relays to a microcontroller and using an off the shelf ethernet library, any longer than you already have. Good lord.
And yes, the 0.1mm of paint is insulative but you really have to do a better mounting job – it’s not something that a teacher would ever accept of a school student in technology class, let alone it being a project that uses mains. Why you you think people earth appliances?
It’s good that you’ve learnt a lot doing this but please be aware that you’ve made a fairly poor job of a relatively trivial task. The good news is, the only way from here is up.
Sweet stuff. You could extend it so that it lights red OR green while lighting yellow to indicate what the previous build result was during building.